Equine Designer Tutorials

We get it…there is no better way to learn than to just watch someone doing it. Starting with our quick start guide through to advanced tips and tricks. These videos should give you the confidence you need to start designing your custom uniforms today.


The Interface

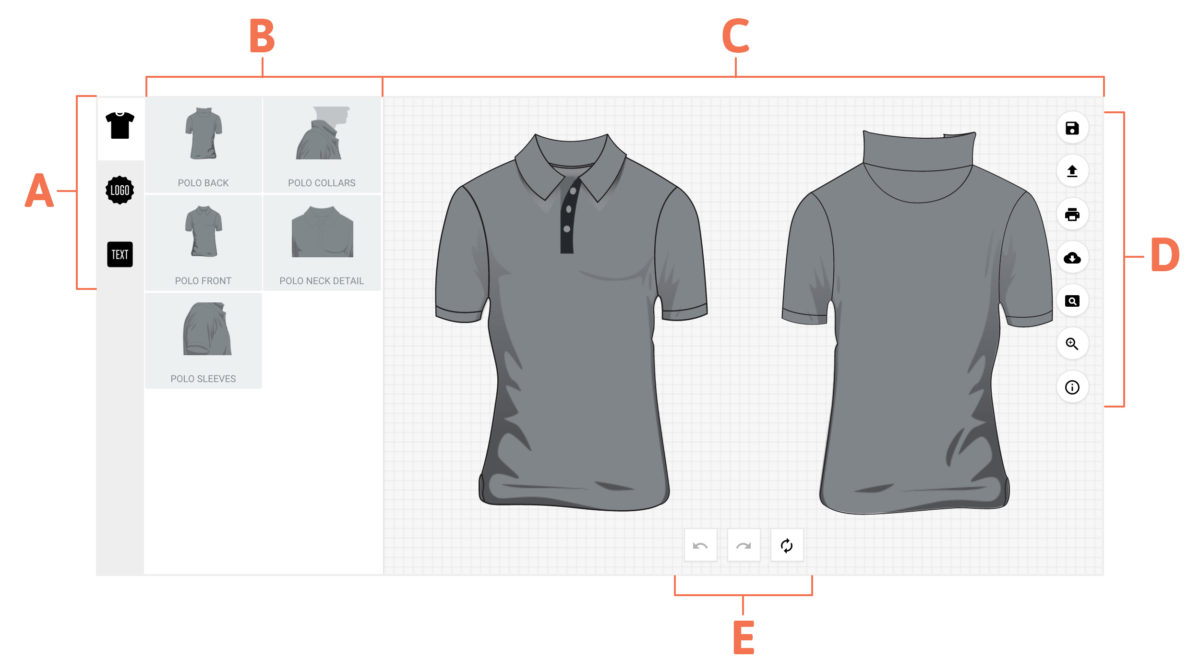
No matter what you are designing, from polo shirts to quilted softshell jackets the interface in the equestrian designer remains the same. This section of the guide covers the primary interface layout and some of the features found within it. We will take a more in depth look at some of these features as well as some that aren’t covered in this section later on.

  • A. Design Features
  • B. Design Categories / Category Elements
  • C. Design Canvas
  • D. Tool Bar
  • E. Undo / Redo / Reset

A. Design Features

Design Categories – Within the design categories you will find all of your customisations options for your garment.
Add Logo – You can add a logo, or design to your garments. These can be customise later to make your uniform truly unique.
Add Text – You can also add custom text to your garment. Custom text has a range of fonts, colours, and styling options for you to choose from.

B. Design Categories / Category Elements

Design Categories are the primary method of customizing your garments. As an example, polo shirts include sections such as collars, or front patterns. Clicking one of these options will bring up the related category elements.
Category elements are the options found within each design category. As an example polo collars include each of the various trim options which are available for you to customize. Such as single, double, or triple striped trim on the edge of your collar.

C. Design Canvas

See your designs come alive – The viewport allows you to see your changes as you make them, as well as giving you the ability to rearrange your text and logos once you have imported them.

D. Tool Bar

Save design – Allows you to save your design to load later.
Retrieve design – Allows you to load your saved designs.
Print – Allows you to print your design
Download – Allows you to print your design
Lightbox – View your design without the user interface elements. Press the large “X” in the top right of the page to go back to the designer.
Magnify Glass – Toggling this allows you to zoom in on your designs.
Info – Brings up the info panel. Here you will find a tutorial video, and a link to our contact info.

E. Undo / Redo / Reset

Undo – Undoes your last action.
Redo – Redoes your last undone action.
Reset – Resets your design entirely.
TIP – Do not use the reset button unless you want to start from the beginning. You will not be able to undo this.

Garment Customisation

Choosing and modifying your designs to create a garment tailored to your exact specifications.

  • A. Search Bar
  • B. Category Elements
  • C. Element Preview

A. Search Bar

Allows you to Search through available design options using text rather than the visual design options.

B. Category Elements

Each of the available design options in an easy to navigate visual preview.

C. Preview Elements

If you hover over one of the options you will get a larger preview image to help you decide on what style best suits your needs.

Colour Customisation

After choosing a category option that you like there are further customisation options that are available to you.

A. The Colour Pallet

Colour – Brings up a large number of colour options.
Reset – Resets your design element.
TIP – Unlike the reset button on the primary interface viewport, this reset button will only affect the changes made to your design category element.

B. Colour Groups

Each design category element will have one or more colour groups for you to customise. Select each colour group and change choose from our range of fabric colours to match your style

C. Available Colours

After selecting a colour group you will have the option to select a new fabric colour to replace the default greyscale design

Uploading a Logo

Pressing the “Add Logo” button allows you to upload an image which you can place on your garment and even recolour.

  • A. Upload Logo
  • B. Error Popup
  • C. Design / Customisation Options

A. Upload a Logo

Allows you to upload your to the Equine Designer. Once uploaded you can place your design on the garment, and customise it.

B. Error Popup

This error message shows up if your design is not within the minimum – maximum pixel size. Please resize your image and try again.

C. Design / Customisation Options

A range of design and customisation options (Explained below).
Colour – Brings up a large number of colour options.
Copy – Copies your logo. Useful if you want the same logo multiple times on one garment.
Rotate – Rotates your logo.
Delete – Removes your logo from the primary interface viewport.
Scale – Resizes the logo.
Advance Rotate and Scale – Brings up an advanced rotation menu.
Position – Brings up a position menu.

Adding Custom Text

Pressing the “Add Text” button allows you to type in custom text which you can place on your garment and edit to match your desired look.

  • A. Add Custom Text
  • B. Custom Text Options
  • C. Advanced Text Options

A. Add Custom Text

Type in your desired custom text and press “ADD TEXT” to place it in the design canvas viewport.

B. Custom Text Options

A large amount of options for your custom text.

C. Advanced Text Options Options

More advanced options for your custom text.

Design / Customization Options Explained

Colour – Brings up a large number of colour options.
Copy – Copies your text. Useful if you want the same logo multiple times on one garment.
Rotate – Rotates your text..
Delete – Removes your text from the design canvas.
Resize – Resizes the text.
Advanced Rotate and Scale – Brings up an advanced rotation menu.
Position – Brings up a position menu.
Font Size – Changes the size of your font.
Edit Text – Allows you to edit the text you have entered.
Text Alignment – Left, Centre, right, or justify align your text.
Upper / Lowercase – Allows you to switch between upper or lower case text.
Curved Text – Allows you to switch between upper or lower case text. This will be explained in greater detail further on.
Typeface – Allows you to choose from a range of typefaces.
Bold
Italic
Underline

Curved Text

RADIUS – Increases or decreased the radius. Ranges from a straight line, to a full circle.
SPACING – Changes the spacing between letters.

If you have any further questions please check out our need help section at the top of the page. And please don’t hesitate to reach out and contact us.